Two-Channel Multi-Sub Setups Using MSO and Equalizer APO
Two-Channel DIY Bass Management for Multiple Subs
MSO can be used together with the Equalizer APO software to implement a two-channel system with multiple subwoofers, flexible "roll your own" bass management and compatibility with most of the filter types available in MSO. This is done by using only two-channel sources, but configuring your sound device for 7.1 channels. Using the custom signal routing capability of Equalizer APO, you can "steal" the surround channels (and possibly others) for use with the subwoofers.
The Equalizer APO Configuration File
Equalizer APO (EAPO) automatically loads a file called config.txt, which specifies filters and other EAPO processing commands. This is located in the C:\Program Files\Equalizer APO\config directory. A sample config.txt is shown below.
Preamp: -10.0 dB
Include: routing.txt
# Include: filters.txt
In this example, a 10.0 dB attenuation is first applied to all channels. Then the file routing.txt is "included", as if its contents were copied and pasted into the config.txt at that location. The Include of filters.txt is commented out via the # symbol. Later we'll use MSO to generate the filters.txt directly from an MSO project. The routing.txt is where we'll direct a mono signal equal to one-half the sum of L and R into the four surround channels.
Contents of routing.txt
# Mute the center channel and LFE outputs
Copy: C=0.0
Copy: LFE=0.0
# Routing for bass management
Copy: SL=0.5*R+0.5*L
Copy: SR=0.5*R+0.5*L
Copy: RL=0.5*R+0.5*L
Copy: RR=0.5*R+0.5*L
# Selective channel muting for measurement only
# Copy: L=0.0
# Copy: R=0.0
# Copy: SL=0.0
# Copy: SR=0.0
# Copy: RL=0.0
# Copy: RR=0.0
In this setup, the intent is to use the Left and Right channels normally, to also "steal" the four surround channels for subwoofer use, and finally to force the outputs of the LFE and Center channels to zero. It's been my experience that when using a sound device in 7.1 mode with only two source channels (Left and Right), the assignment of channels that don't explicitly have a source via the Copy command is necessary to avoid intermittent spurious noises. This could be due to a bug in my sound card's driver though. At any rate, it can't hurt.
The first two EAPO Copy commands are used to mute the center and LFE channels respectively, by setting them to the value 0.0. The decimal separator is needed in this case, as Equalizer APO interprets an integer value in the Copy statement as a channel number. Next, the Left Surround, Right Surround, Left Rear Surround and Right Rear Surround channels are appropriated for subwoofer use by assigning them to a mono summation of Left and Right channels, scaled by 0.5 to avoid digital clipping. Finally, there is a collection of muting commands for the six channels we wish to use. These commands are used for measurement purposes only, and are all commented out in normal use.
When measuring using an acoustic timing reference, only the acoustic timing reference channel and the channel being measured should be energized. When using a hardware loopback timing reference, the Copy: C=0.0 statement can be commented out, and the center channel used for the loopback output.
When the routing.txt file is opened in the EAPO Configuration Editor software, each of those commented Copy commands for those six channels will be assigned a button which can be used to toggle the commented status of the statement. By putting the EAPO Configuration Editor in Instant mode, toggling the appropriate button instantly mutes or unmutes its channel. This makes it easy to measure one channel at a time, without any need to turn hardware on and off. When you're done measuring, the bottom group of Copy commands used for muting should be returned to their commented-out state to ensure all six channels are active. The LFE channel should be left muted in the commands at the top of the file, as it is not used. As mentioned above, if you're using the center channel for a hardware loopback output, the center channel should be unmuted.
In addition to the signal routing provided above in routing.txt, you should configure your sound device in Windows Control Panel to set all speakers to Large, including main speakers, center, and surrounds. The crossover will be implemented in filters.txt as described below and shown in the sample project.
Saving Equalizer APO Data For the Entire Configuration
For this application, the exported configuration in filters.txt will include not only individual PEQs for the subs and main speakers, but also the low-pass and high-pass filters to be used in the "roll your own" bass management. This is best shown by an example. The image below is from a downloadable example, which is just a contrived project with no imported measurements. It's used only to illustrate the EAPO configuration export feature. Downloading the example to follow the steps below is recommended.
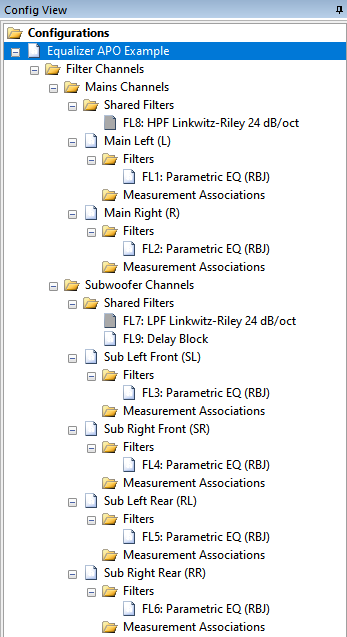
This project has one PEQ in each of the sub and main speaker channels. The crossover is implemented using a shared fourth-order Linkwitz-Riley high-pass filter ("HPF Linkwitz-Riley 24 dB/oct") for the main speakers, and a shared fourth-order Linkwitz-Riley low-pass filter ("LPF Linkwitz-Riley 24 dB/oct") for the subs. Their icons are gray in color to indicate their parameters are locked. In this case, their cutoff frequencies are both set to 80 Hz and locked there. FL9 is a shared sub delay block. It has a negative delay, in this case -5.0 msec. We'll see what happens to this negative delay when we export the file shortly. The sub and main speaker channels have been named with their Equalizer APO channel names in parentheses. See the top row of this table for EAPO channel names. This is to make it easier to associate MSO channel names with EAPO channel names, which we'll see in the following steps.
Exporting the configuration can be done in one of two ways.
- Right-click the root node of the configuration in the Config View and choose Save Equalizer APO Text for this Configuration, or
- In the main menu, choose Config, Save Config to Equalizer APO Text File, then choose a configuration from the list.
The Associate Channel Names Dialog Box
After choosing one of the two methods above to export the chosen configuration to Equalizer APO format, you'll be presented with the Associate Channel Names dialog box as shown below.
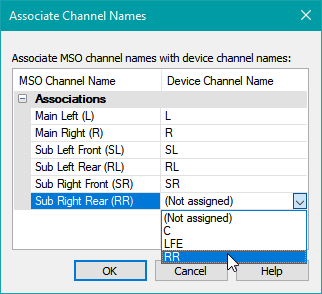
The purpose of this dialog is to associate the MSO channel names defined by the user with the predefined EAPO channel names L, R, C, LFE, RL, RR, SL and SR. The last four predefined names correspond to rear left, rear right, side left and side right respectively.
If you click in a cell in the right-hand column, a combo box will appear, allowing you to choose from the predefined set of EAPO channel names. The list of available EAPO channel names in each combo box ensures that each name is uniquely assigned. The chosen channel must correspond to the actual channel used for the given speaker or sub. That's why the MSO channel names had the EAPO channel names in parentheses earlier in this example. Keeping this all straight requires a bit of bookkeeping.
Saving filters.txt
Next, you'll be shown a standard Windows File, Save dialog. Choose filters.txt as the file name. That's what we'll use for the file of the same name that was previously discussed in connection with EAPO's configuration file config.txt.
The resulting filters.txt looks as follows.
# MSO channel name = "Main Left (L)", Equalizer APO channel name = "L"
# MSO channel name = "Main Right (R)", Equalizer APO channel name = "R"
# MSO channel name = "Sub Left Front (SL)", Equalizer APO channel name = "SL"
# MSO channel name = "Sub Left Rear (RL)", Equalizer APO channel name = "RL"
# MSO channel name = "Sub Right Front (SR)", Equalizer APO channel name = "SR"
# MSO channel name = "Sub Right Rear (RR)", Equalizer APO channel name = "RR"
Channel: L
# FL8A
Filter: ON HPQ Fc 80.00 Hz Q 0.7071
# FL8B
Filter: ON HPQ Fc 80.00 Hz Q 0.7071
# FL9
Delay: 5.00 ms
# FL1
Filter: ON PK Fc 80.00 Hz Gain -1.00 dB Q 2.0000
Channel: R
# FL8A
Filter: ON HPQ Fc 80.00 Hz Q 0.7071
# FL8B
Filter: ON HPQ Fc 80.00 Hz Q 0.7071
# FL9
Delay: 5.00 ms
# FL2
Filter: ON PK Fc 80.00 Hz Gain -2.00 dB Q 2.0000
Channel: SL
# FL7A
Filter: ON LPQ Fc 80.00 Hz Q 0.7071
# FL7B
Filter: ON LPQ Fc 80.00 Hz Q 0.7071
# FL3
Filter: ON PK Fc 80.00 Hz Gain -3.00 dB Q 2.0000
Channel: RL
# FL7A
Filter: ON LPQ Fc 80.00 Hz Q 0.7071
# FL7B
Filter: ON LPQ Fc 80.00 Hz Q 0.7071
# FL5
Filter: ON PK Fc 80.00 Hz Gain -5.00 dB Q 2.0000
Channel: SR
# FL7A
Filter: ON LPQ Fc 80.00 Hz Q 0.7071
# FL7B
Filter: ON LPQ Fc 80.00 Hz Q 0.7071
# FL4
Filter: ON PK Fc 80.00 Hz Gain -4.00 dB Q 2.0000
Channel: RR
# FL7A
Filter: ON LPQ Fc 80.00 Hz Q 0.7071
# FL7B
Filter: ON LPQ Fc 80.00 Hz Q 0.7071
# FL6
Filter: ON PK Fc 80.00 Hz Gain -6.00 dB Q 2.0000
The file begins with a set of comments showing the chosen associations between MSO and EAPO channel names. For the L and R channels, there are two details worth noting.
- The shared fourth-order Linkwitz-Riley high-pass filter FL8 has been automatically factored into two second-order Butterworth high-pass filters FL8A and FL8B, and replicated in each main speaker channel for compatibility with EAPO.
- The shared negative sub delay FL9, with a delay value of -5.00 msec, has been automatically converted to a positive delay of 5.00 msec, and moved and replicated into the Left and Right main speaker channels.
Likewise, there are two noteworthy aspects of the data for the SL, SR, RL and RR channels used for the subs.
- The shared fourth-order Linkwitz-Riley low-pass filter FL7 has been automatically factored into two second-order Butterworth low-pass filters FL7A and FL7B, and replicated in each sub channel.
- The shared negative sub delay FL9, with a delay value of -5.00 msec, is not present in the sub channels. This is because this negative delay has had its value negated, and it's been moved and replicated into the Left and Right main speaker channels.
Real-world applications will of course be more complex than this oversimplified example, using imported measurements and optimization just like any normal MSO project. Be sure to check the Equalizer APO filter compatibility table to make sure the filters you use are compatible with EAPO file export. If MSO finds incompatible filters when you attempt to perform the export, it will show an error message.
Assuming these real-world requirements have been met, exporting the EAPO text file in this way leads to a filters.txt that's usable in the EAPO config.txt described above without needing any manual editing at all. All that needs to be done is to copy it from its initially saved location into the C:\Program Files\Equalizer APO\config directory. Then in the EAPO Configuration Editor, toggle the state of the Include command for this file to On. If Instant mode is enabled in the Configuration Editor, you'll see the effect of this change right away.
Saving Equalizer APO Data For a Single Channel
Although it's not recommended in general, in very rare cases you might want to save the filters of a single channel to Equalizer APO format. You can do this in one of two ways.
- You can use a context menu in the Config View to export the data for the configuration and channel you choose.
- From the main menu, you can launch a dialog that allows you to select the combination of configuration and channel for Equalizer APO export.
These two methods are described below.
Exporting Single-Channel Data Using the Config View
In the Config View, expand the tree display of the configuration whose channel data you wish to export. Locate the node of the channel whose data you wish to export and right-click its Filters sub-node as shown below.
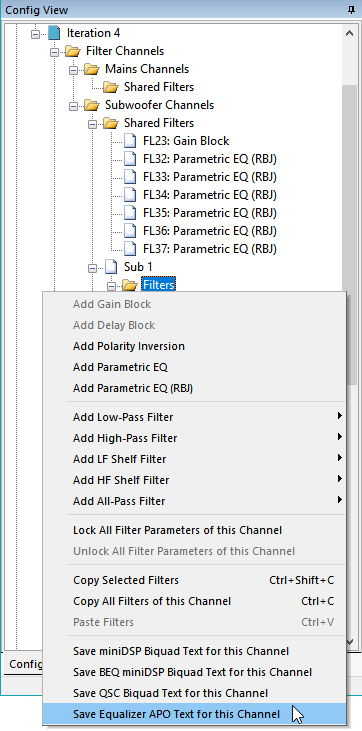
Choose Save Equalizer APO Text for this Channel from the context menu.
Exporting Single-Channel Data Using the Main Menu
From the main menu, choose Config, Save Channel to Equalizer APO Text File. This will cause the dialog box shown below to be launched.
The Channels for Equalizer APO File Save Dialog
The Channels for Equalizer APO File Save dialog allows you to select the combination of configuration and channel name for exporting to Equalizer APO format.
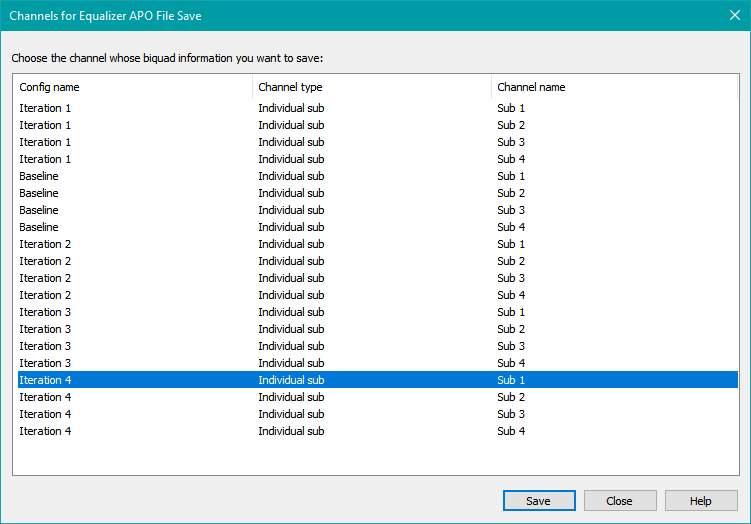
Since Equalizer APO doesn't use shared channels, no shared channels will be shown in this dialog. When MSO exports the individual channel's filters, it finds any shared channel in that individual channel's path and replicates the filters of the shared channel into each individual channel to make an equivalent system that can be used by Equalizer APO.
Choose the combination of configuration and channel name to export, then press Save to save that channel's data. This can be done for as many channels as desired. Press Close when done.
The Choose Destination Channel Dialog
After performing one of the above two methods, you'll be presented with the Choose Destination Channel dialog shown below.
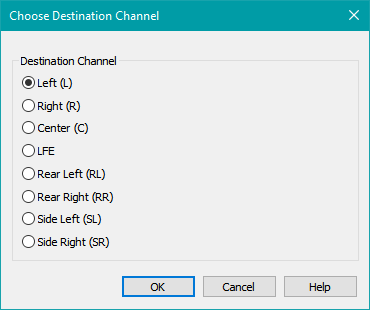
Choose the desired destination channel from the radio button list of predefined Equalizer APO channel names and press OK. You'll be shown a standard Windows File, Save dialog. Enter the desired name for the saved file and press Save to save the file.