Tabbed Window Navigation
Navigating Tabbed Windows
MSO uses a very old Windows C++ application framework from Microsoft called the Microsoft Foundation Classes (MFC), originally introduced in the early 1990s. It was augmented in 2008 with the so-called "MFC Feature Pack", which Microsoft purchased from a third party and added to its Visual Studio development tool. The Feature Pack adds support for tabbed MDI child windows (the tabbed windows that MSO uses for its graphs and some other displays). Unfortunately, this third-party tabbed MDI support is somewhat buggy. The bugs show up when you have a large number of tabbed MDI child windows so that tab scrolling is required, and you try to reorder the tabs by dragging them.
To help compensate for the buggy tabbed MDI behavior of the MFC Feature Pack, MSO adds some new MDI child window navigation features. These consist of the window navigation shortcut keys, the Window menu, and the Windows dialog.
Window Navigation Shortcut Keys
To quickly activate the next MDI child window, press Ctrl+Tab. To activate the previous MDI child window, press Ctrl+Shift+Tab.
The Window Menu
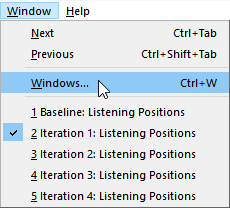
The Window menu consists of three groups of commands as shown below.

- The first group of menu items contains the Next and Previous commands. These are present mostly as a reminder that the Ctrl+Tab and Ctrl+Shift+Tab keyboard shortcuts can be used for these commands.
- The second menu item group allows you to open the Windows dialog described below.
- The third menu item group is a list of all the MDI child windows you can activate from this menu. The currently active window will be checked. You can activate another window by selecting it with the mouse or typing the number corresponding to the prefix of the window name.
The Windows Dialog
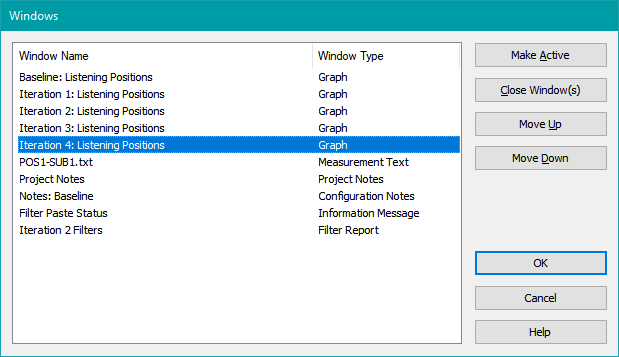
The Windows dialog can be invoked by choosing Windows from the Window menu shown above using the mouse, by pressing Alt+W, W, or by pressing Ctrl+W. When you do so, you'll be presented with the dialog below.

The Window List
The window list shows each window's name in the left column and its type on the right. Up to six window types may appear as shown above.
When the dialog is first launched, the currently active window is selected. Multiple selection is possible, including non-contiguous ranges, using standard Windows mouse and keyboard selection techniques. You can select all windows using the Ctrl+A shortcut. This comes in handy if you want to close all the MDI child windows.
The Make Active Button
When a single list row is selected, the Make Active button becomes enabled. If you click it or press Alt+A, it will change the active MDI child window right away, so you have visual feedback of what the active window will be after you close the dialog using the Enter key or OK button.
The Close Windows Button
When one or more list rows are selected, the Close Windows button becomes enabled. If you click it or press Alt+C, the selected windows will be removed from the window list. The windows themselves won't be closed until you close the dialog using the Enter key or OK button.
The Move Up and Move Down Buttons
When one or more list rows are selected, the Move Up and Move Down buttons may become enabled, depending on whether the selection range and position allow the required movement. These commands can be used with single selection, contiguous multiple selection and even non-contiguous multiple selection. The Move Up command can be invoked using Alt+U or Alt+Up Arrow in addition to clicking the Move Up button. The Move Down command can be invoked using Alt+D or Alt+Down Arrow in addition to clicking the Move Down button.
Closing The Dialog
If you close the dialog using the Esc key or Cancel button, the original MDI child window arrangement will be restored, even if you have chosen to close windows, reorder windows or select a different window as the active one. If you close the dialog using the Enter key or OK button, all your changes will be applied.
Tip: Configuring Windows to Always Show Alt Shortcuts Underlined
Old-timers may remember that early versions of Windows always showed characters associated with Alt-key shortcuts in menus and dialog boxes with those characters underlined. At some point, they changed this behavior so these characters were only shown underlined after pressing the Alt key. You can restore the original behavior using the following steps.
-
For Windows 11:
- Open the Settings app.
- Choose Accessibility.
- Under Interaction, choose Keyboard.
- Set Underline access keys to On.
-
For Windows 10:
- Open the Settings app.
- Choose Ease of Access.
- Select Keyboard in the left pane.
- Scroll down to find Change how keyboard shortcuts work in the right pane.
- Enable Underline access keys when available.